ML for the first time, to Google Teachable Machine making my project LearnLily special.

Speech Detector and Analyser
The ML model that I trained and used in LearnLily can detect postures while speaking (namely, good eye contact, bad eye contact, fidgeting, slump), detect fumbles and backgrond noise while talking and also detect whether you are giving your speech with or without any aids (phone, notes, etc.) Sounds interesting? Check out how it works live here.
A little background
It was my very first time working with Machine Learning which was initially quite intimidating since I am not naturally inclined towards Python. I tend to be more of a Javascript person.
The absolute blessing moment came when I discovered the Tensorflow.js library.
Once I started reading up more on it and delved deeper, I discovered 'Google Teachable Machine, which has been rightly described by Google as "A fast, easy way to create machine learning models for your sites, apps, and more – no expertise or coding required."
As excited as I am?
Read more on Google Teachable Machine and utilize it in your own fun projects!
Please note: This is in no way an exhaustive Google Teachable Machine tutorial, just a surface coding walkthrough. For better tutorials or if you are a beginner, check out Google Teachable Machine's own tutorials or Coding Train's.
STEP 1
Train your 'Google Teachable Machine' model (or in my case, model-s).
- Pose Model:
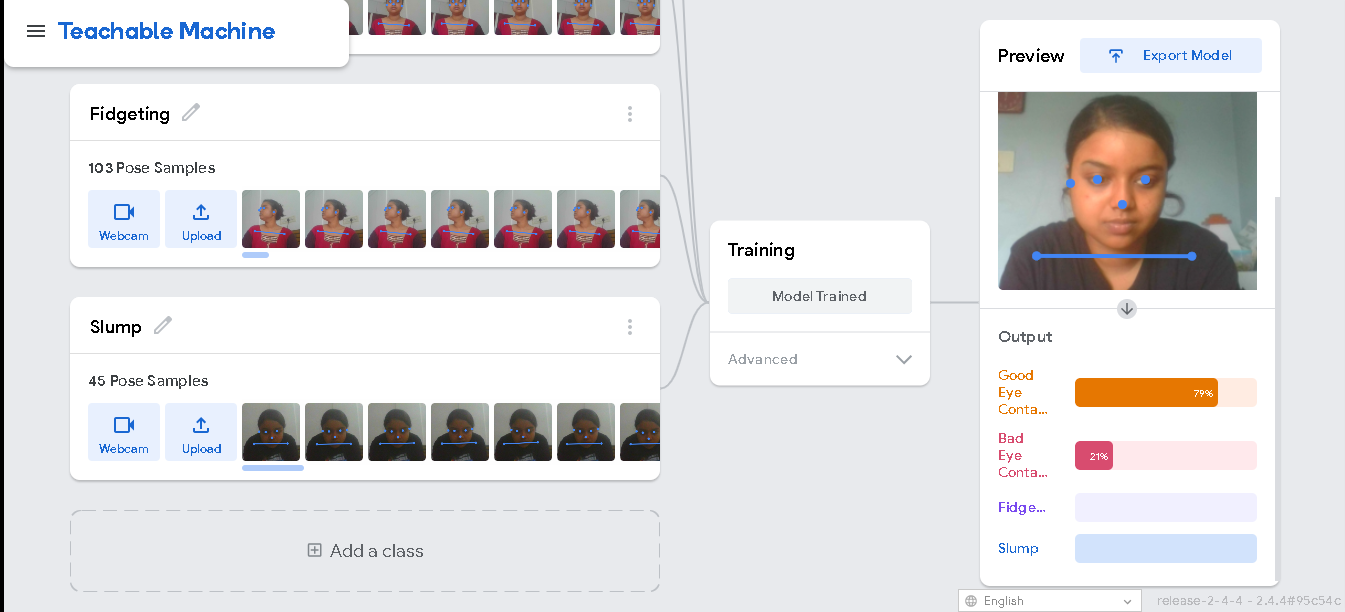
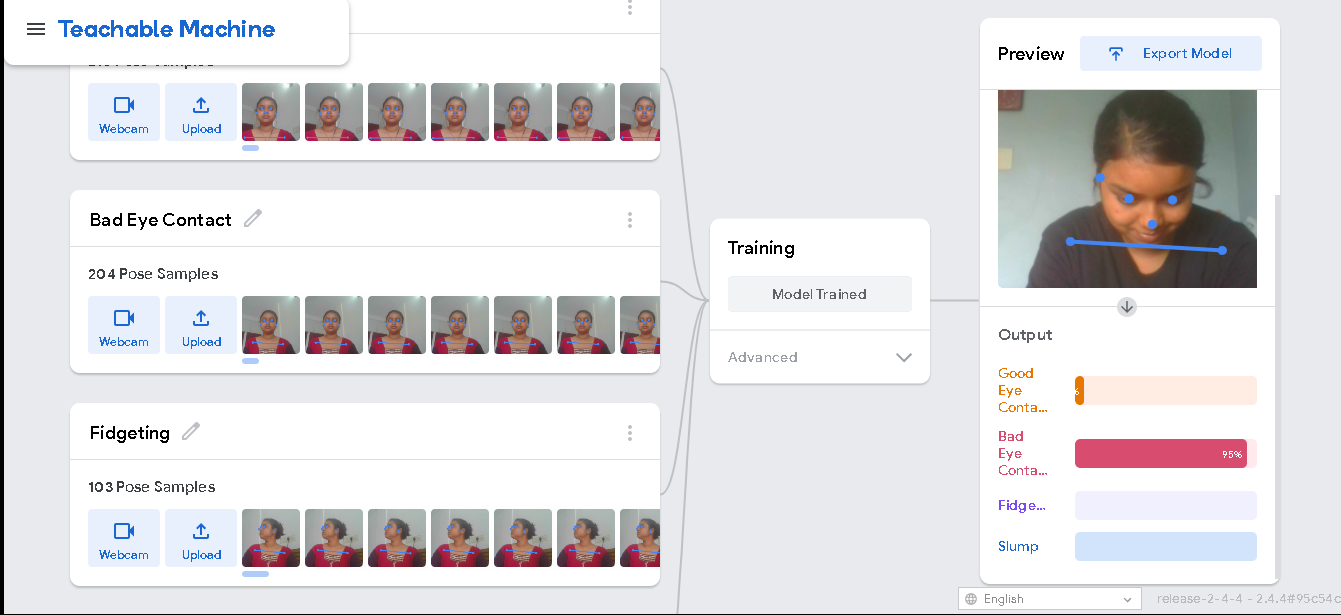
My Google Teachable Machine Pose Model will be able to detect four classes of posture- good eye contact, bad eye contact, fidgeting and slump (shoulder slump).
- Image Model:
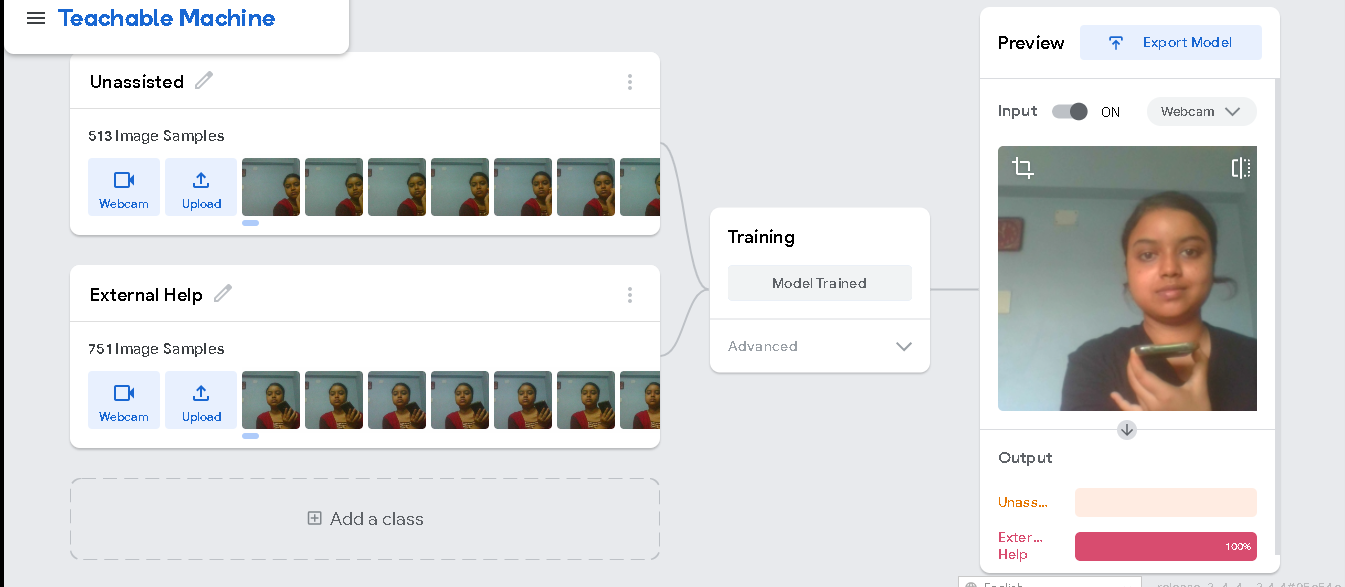
My Google Teachable Machine Image Model will be able to detect two classes- unassisted and external aid.
- Audio Model:
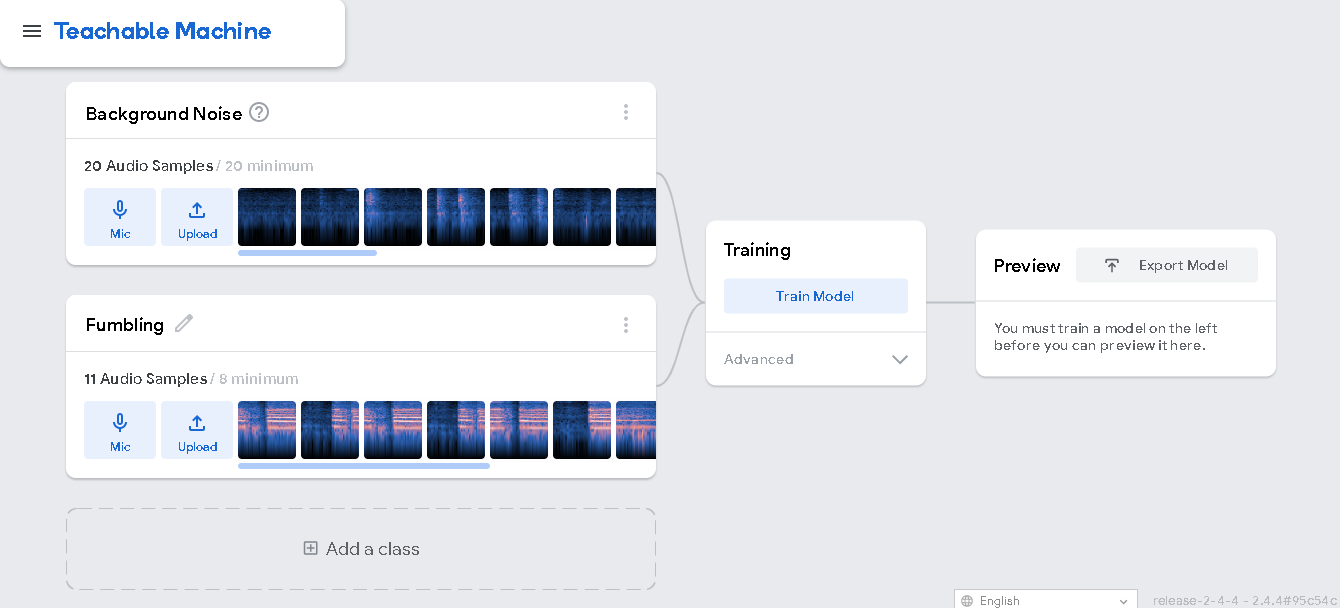
My Google Teachable Machine Audio Model will be able to detect one additional class apart from 'Background noise'- which is, fumbling.
Once you're done adding datasets to your classes, click on Train Model and then generate the export code. Since I am using Javascript, my code here today will be as such.
STEP 2
Code. Code. Code. Wait. Code.
- First, add in your model URLs at the very top.
const POSE_URL = "https://teachablemachine.withgoogle.com/models/gCKJy2yBv/";

const AUDIO_URL = "https://teachablemachine.withgoogle.com/models/1jaFMEKV8/";

let modelimage, webcamimage, imagelabelContainer, maxPredictionsimage;
let modelpose, webcampose, ctx, poselabelContainer, maxPredictionspose;
- Next, add the audio model and create
recogizer.
async function createModel() { // for audio model
    const checkpointURL = AUDIO_URL + "model.json"; // model topology
    const metadataURL = AUDIO_URL + "metadata.json"; // model metadata

    const recognizer = speechCommands.create(
        "BROWSER_FFT", // fourier transform type, not useful to change
        undefined, // speech commands vocabulary feature, not useful for your models
        checkpointURL,
        metadataURL
    );

    // check that model and metadata are loaded via HTTPS requests.
    await recognizer.ensureModelLoaded();

    return recognizer;
}
-
Next, load the image and pose models and set up the web cam. Note that the
init()function gets triggered when you hit the 'Start Recording' button.async function init() { // Changing the button text document.querySelector("#record-btn").innerHTML = "Starting the magic..."; // Changing final report visibility document.querySelector("#speech-final-rep").style.display = "none"; const modelURLimage = IMAGE_URL + "model.json"; const metadataURLimage = IMAGE_URL + "metadata.json"; const modelURLpose = POSE_URL + "model.json"; const metadataURLpose = POSE_URL + "metadata.json"; // load the model and metadata modelimage = await tmImage.load(modelURLimage, metadataURLimage); maxPredictionsimage = modelimage.getTotalClasses(); // load the model and metadata modelpose = await tmPose.load(modelURLpose, metadataURLpose); maxPredictionspose = modelpose.getTotalClasses(); // Convenience function to setup a webcam const height = 350; const width = 350; const flip = true; // whether to flip the webcam webcamimage = new tmImage.Webcam(width, height, flip); // width, height, flip webcampose = new tmPose.Webcam(width, height, flip); // width, height, flip // Change button text document.querySelector("#record-btn").innerHTML = "Loading the model..."; await webcampose.setup(); // request access to the webcam //await webcamimage.setup(); await webcampose.play(); //await webcamimage.play(); window.requestAnimationFrame(loop); } -
Next, create a canvas where your webcam can be rendered for recording your speech. Also, add subsequents
<div>s according to the number of classes that you have used. Keep adding the following code toinit(), the main function unless I give you a heads up!
// Change button text
    document.querySelector("#record-btn").innerHTML = "Loading the model...";

    await webcampose.setup(); // request access to the webcam
    //await webcamimage.setup();
    await webcampose.play();
    //await webcamimage.play();
    window.requestAnimationFrame(loop);

    // Change button text
    document.querySelector("#record-btn").innerHTML = "Please Be patient...";

    // append elements to the DOM
    const canvas = document.getElementById("canvas");

    canvas.width = width; canvas.height = height;
    ctx = canvas.getContext("2d");

    poselabelContainer = document.getElementById("pose_label-container");
    for (let i = 0; i < maxPredictionspose; i++) { // and class labels
        poselabelContainer.appendChild(document.createElement("div"));
    }

    imagelabelContainer = document.getElementById("image_label-container");
    for (let i = 0; i < maxPredictionsimage; i++) { // and class labels
        imagelabelContainer.appendChild(document.createElement("div"));
    }

    // audio recogniser
    window.recognizer = await createModel();
    const classLabels = recognizer.wordLabels(); // get class labels
    const audiolabelContainer = document.getElementById("audio_label-container");
    for (let i = 0; i < classLabels.length; i++) {
        audiolabelContainer.appendChild(document.createElement("div"));
    }
- With me so far? Now, we are getting to the pointy and more interesting bits. In the following code, I have pushed the
result.scores[i].toFixed(2)*100class values as live feedback on thehtmlpage. Feel free to ignore storing the data in arrays, array graph data and sum of the data unless you need them to manipulate any part of your project. In my case, I used them- so I am still keeping them here for your reference.// declare the arrays empty const scores = result.scores; // probability of prediction for each class // render the probability scores per class for (let i = 0; i < classLabels.length; i++) { const classPrediction = classLabels[i] + ": " + result.scores[i].toFixed(2)*100 + "%"; audiolabelContainer.childNodes[i].innerHTML = classPrediction; } // Store data in arrays audio1arr.push(result.scores[0].toFixed(2)*100); audio2arr.push(result.scores[1].toFixed(2)*100); // Store audio graph data audiogr.push(Math.round(100 - ((result.scores[0].toFixed(2)*100) + (result.scores[1].toFixed(2)*100)))); // Store array sum sumaudioarr1 += result.scores[0].toFixed(2)*100; sumaudioarr2 += result.scores[1].toFixed(2)*100;}, { includeSpectrogram: true, // in case listen should return result.spectrogram probabilityThreshold: 0.75, invokeCallbackOnNoiseAndUnknown: true, overlapFactor: 0.50 // probably want between 0.5 and 0.75. More info in README }); - That's a wrap for our
init()function. Next, let's head on to ourloop().webcampose.update(); // update the webcam frame webcamimage.update(); await predict(); window.requestAnimationFrame(loop); }
Feeling confused? Been there too. Feel free to check out Google Teachable Machine official repository for better instructions on what each function doe here.
Next, we run our model through the pose and image models. Stay with me, this is easier than it's shorter. The predict() function here does the same as the audio model above. Once again, feel free to ignore the arrays and sum variables if they aren't use to you.
// run the webcam image through the image model
async function predict() {
  const { pose, posenetOutput } = await modelpose.estimatePose(webcampose.canvas);

  const predictionpose = await modelpose.predict(posenetOutput);
  // predict can take in an image, video or canvas html element
  const predictionimage = await modelimage.predict(webcampose.canvas);

  // Image model texts
  imagelabelContainer.childNodes[0].innerHTML = predictionimage[0].className + ": " + predictionimage[0].probability.toFixed(2)*100 + "%";
  imagelabelContainer.childNodes[0].style.color = "#0dd840";
  imagelabelContainer.childNodes[1].innerHTML = predictionimage[1].className + ": " + predictionimage[1].probability.toFixed(2)*100 + "%";
  imagelabelContainer.childNodes[1].style.color = "#ee0a0a";

  // Store image data in array
  image1arr.push(predictionimage[0].probability.toFixed(2)*100);
  image2arr.push(predictionimage[1].probability.toFixed(2)*100);

  // Store image graph data
  imagegr.push(Math.round(predictionimage[1].probability.toFixed(2)*100));

  // Store data array sum
  sumimagearr1 += predictionimage[0].probability.toFixed(2)*100;
  sumimagearr2 += predictionimage[1].probability.toFixed(2)*100

  // Pose model texts
  poselabelContainer.childNodes[0].innerHTML = predictionpose[0].className + ": " + predictionpose[0].probability.toFixed(2)*100 + "%";
  poselabelContainer.childNodes[0].style.color = "#0dd840"; //good eye contact
  poselabelContainer.childNodes[1].innerHTML = predictionpose[1].className + ": " + predictionpose[1].probability.toFixed(2)*100 + "%";
  poselabelContainer.childNodes[1].style.color = "#ee0a0a"; //bad eye contact
  poselabelContainer.childNodes[2].innerHTML = predictionpose[2].className + ": " + predictionpose[2].probability.toFixed(2)*100 + "%";
  poselabelContainer.childNodes[2].style.color = "#ee0a0a"; //fidgeting
  poselabelContainer.childNodes[3].innerHTML = predictionpose[3].className + ": " + predictionpose[3].probability.toFixed(3)*100 + "%";
  poselabelContainer.childNodes[3].style.color = "#ee0a0a"; //slump

  // Store pose data in array
  pose1arr.push(predictionpose[0].probability.toFixed(2)*100);
  pose2arr.push(predictionpose[1].probability.toFixed(2)*100);
  pose3arr.push(predictionpose[2].probability.toFixed(2)*100);
  pose4arr.push(predictionpose[3].probability.toFixed(2)*100);

  // Store pose graph data
  posegr.push(Math.round((predictionpose[0].probability.toFixed(2)*100) - ((predictionpose[1].probability.toFixed(2)*100)+(predictionpose[2].probability.toFixed(2)*100)+(predictionpose[3].probability.toFixed(2)*100))));

  // Store data sum
  sumposearr1 += predictionpose[0].probability.toFixed(2)*100;
  sumposearr2 += predictionpose[1].probability.toFixed(2)*100;
  sumposearr3 += predictionpose[2].probability.toFixed(2)*100;
  sumposearr4 += predictionpose[3].probability.toFixed(2)*100;

  // finally draw the poses
  drawPose(pose);
  }
-
In the next step, you have to update the webcam frame with the drawn pose keypoints which the model returns. One interesting thing to note here will be
minPartConfidenceparameter.function drawPose(pose) { if (webcampose.canvas) { ctx.drawImage(webcampose.canvas, 0, 0); // draw the keypoints and skeleton if (pose) { const minPartConfidence = 0.5; tmPose.drawKeypoints(pose.keypoints, minPartConfidence, ctx); tmPose.drawSkeleton(pose.keypoints, minPartConfidence, ctx); } } } -
To wrap up, add a 'Stop Recording' trigger button that will stop the ML model and you can do all your data calculatons here. (Here is where my sum variables and arrays come into play). Again, explore those only if you need them.
{ await webcampose.stop(); recognizer.stopListening(); endtime = Date.now(); timeslot = (endtime - starttime)/1000; if(timeslot < 60) { window.timeprint = timeslot + " seconds"; } else { minutes = Math.floor(timeslot/60); seconds = Math.floor(timeslot - minutes * 60); window.timeprint = minutes + " minutes and " + seconds + " seconds"; } sumaudioarr1 /= audio1arr.length; sumaudioarr2 /= audio2arr.length; sumimagearr1 /= image1arr.length; sumimagearr2 /= image2arr.length; sumposearr1 /= pose1arr.length; sumposearr2 /= pose2arr.length; sumposearr3 /= pose3arr.length; sumposearr4 /= pose4arr.length; window.posesc = Math.round(sumposearr1- (sumposearr2+sumposearr3+sumposearr4)); window.audiosc = Math.round(100 - (sumaudioarr1+sumaudioarr2)/2); window.imagesc = Math.round(sumimagearr1 - sumimagearr2); document.querySelector("#speech-report-div").style.display = "none"; document.querySelector("#pose-rep").innerHTML = posesc + "% near perfect"; document.querySelector("#audio-rep").innerHTML = audiosc + "% confident voice"; document.querySelector("#image-rep").innerHTML = imagesc + "% unassisted"; document.querySelector("#time-rep").innerHTML = timeprint; speechgraph(window.posesc,window.audiosc,window.imagesc,window.timeprint); document.querySelector("#speech-final-rep").style.display = "block"; document.querySelector("#record-btn").innerHTML = "Start Recording"; document.querySelector("#stop-record-btn").style.display = "none"; } -
No, you have been great enough. So, no more code. :D
-
And that being said, there WAS a lot more code that I added after this to render the readings as a graph and stuff, but that's rambling for another day. Feel free to check all the code for LearnLily on my Github repo if you are interested.
STEP 3
Finally, with all the code written, you can take a few minutes to relax just like I did after completing 10 weeks of hard work during the Qoom Creator Group. It was such an amazing experience for me and my mentors were so darn amazing and supportive!
Also, just in case, my final product looked like this:
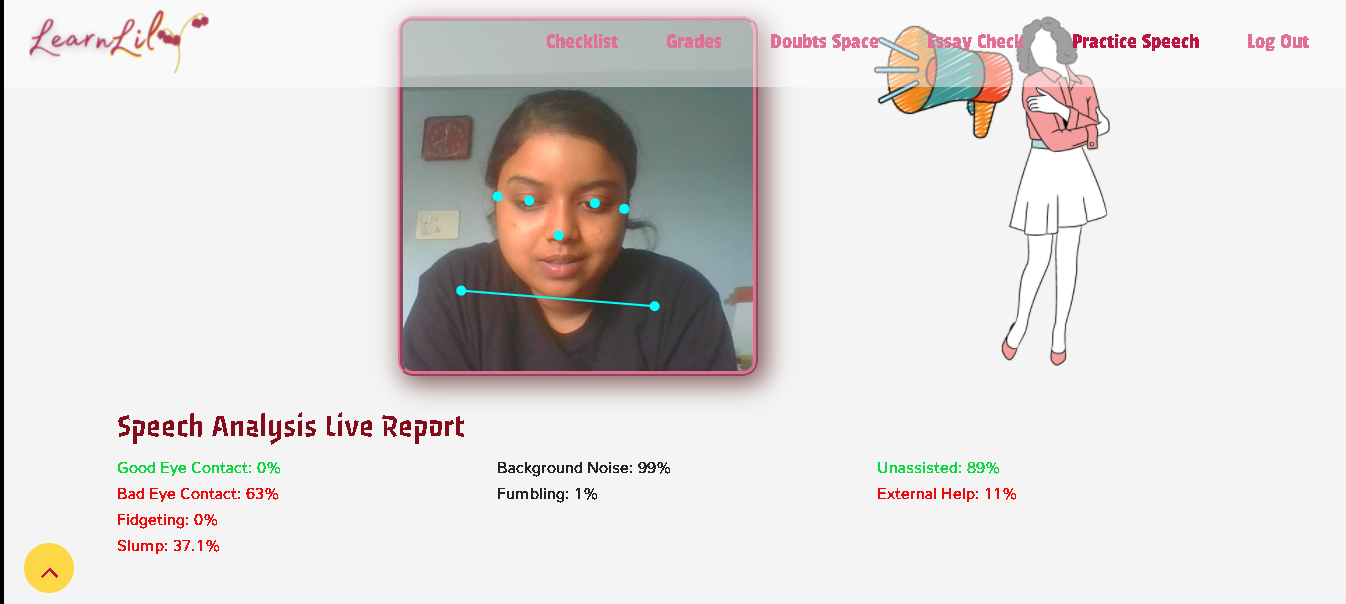
I couldn't show you the fidgeting score haha because I was taking the screenshot and was feeling lazy to set a timer. :(
Feel free to mail me at swatilekha.roy4@gmail.com for any doubts or for feedback! I'll try my best to help you out.
Also, find my entire project LearnLily [here](https://swatilekharoy.qoom.space/~/LearnLily). This Speech detection model is just a part of it.
(and some shameless self promotion, but if you want to check out my portfolio, I would love to know your thoughts!)
Stay tuned and do not miss the next Qoom Creator Group cohort! It's a really unique learning experience.